Purge Your Website Cache to Show Changes In Your Browser
If you are struggling to get your saved changes to show on your website, you may need to clear the cache in your browser and on your website. This guide will walk you through how to do that to ensure that you and your visitors are receiving the most recent copy of your changes when viewing your site.
Clear Your Browser Cache
First, before clearing any caches on your website, we recommend trying to reset your browser cache. Oftentimes these issues are caused locally within the browser, and additional load can be reduced on the server if the global cache is not cleared.
- Browse to the page you wish to see your saved changes on, or that you are experiencing issues with your changes appearing on.
- Reset the Browser Cache by following the steps in your browser:
- Google Chrome: Press CTRL+F5 or CTRL+SHIFT+R in your browser
- Chromium: Press CTRL+F5 in your browser
- Mozilla Firefox: Press CTRL+F5 or CTRL+SHIFT+R
- Safari: Press CTRL+F5 in your browser
- Check if that fixed the problem before continuing.
Reset Your WordPress Cache
Resetting your WordPress cache allows your WordPress website to regenerate all of the files used to serve faster versions of your website to your visitors. Sometimes these files can become outdated and cause issues with how the front-end of your website appears, and a simple cache purge/flush can solve the problem.
If you are purchasing hosting services through Falls Tech Group, we default all installations to W3 Total Cache.
W3 Total Cache
To reset the cache provided by the plugin ‘W3 Total Cache’, you can follow the steps below.
- Log into your WordPress website
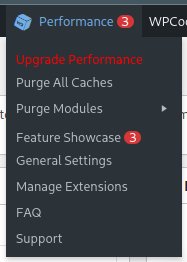
- From the admin dashboard, find the ‘Performance’ button in the admin bar at the top, and over over it

A screenshot of the ‘Performance’ menu provided by W3 Total Cache in the WordPress Admin Dashboard. - Click Purge All Caches
- Go to the page affected by the issue that you were trying to fix
- Perform the steps above in the ‘Clear Your Browser Cache’ section
- Check to see if the problem is resolved before continuing.
Clear Your Web Hosting Cache (Legacy Hosting)
If you are using our legacy hosting services powered by Litespeed Web Server, you can follow the steps below to reset your hosting cache.
To identify whether or not you are using our legacy hosting services, you can visit your cPanel dashboard to check if the URL has one of the following URLs:
d01-kh.ftghost.netIf so, your account is currently on our legacy systems. Please contact support if you have any questions or wish to upgrade your services.
- Log into your cPanel account
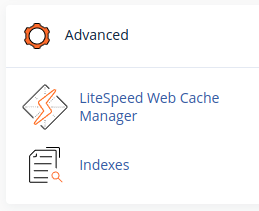
- Find the Advanced section, and click LiteSpeed Web Cache Manager

A screenshot of the ‘Advanced’ section within the cPanel Dashboard depicting button to navigate to the LiteSpeed Web Cache Manager. - Scroll down to the ‘Flush LSCache’ section, and click Flush All

A screenshot of the LiteSpeed Cache Flush Tool and the button to Flush All caches.
Article Overview
On this page
Topics Discussed
Share this article
